

www.EducationDx.com
This is a FREE information site!
Part of EdDx Educational Series
Part of EdDx Educational Series

>>PHOTOS and ILLUSTRATIONS on this site<<
Installing a Venting System on the WM Boiler
Selecting a Venting System


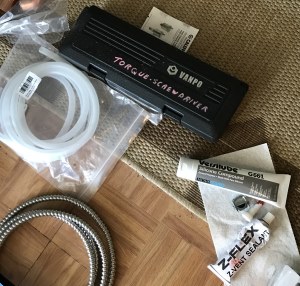
Materials=Check
Tools=Check
Pipe=It's here, but not in this photo
Tools=Check
Pipe=It's here, but not in this photo
The starting collar base is the only place that the Z Vent will be installed with the Z Vent Sealant. All the other sections have built-in gaskets that only require a light coating of Versalube Silicone Compound.

")
Planning, measuring and orienting the Z Vent (a dry fit)
The venting requires a 1/4" per foot rise, and the small pieces of rope helped hold the pipe temporarily in the approximate position. Also, doing this solo probably prevented any helper from any harm!


Cutting the Z Vent was relatively easy. After measuring "twice"--you wrap a sheet of paper around the pipe to keep it even, then just trace the top of the paper with a perm pen marker. (cut male end ONLY, the female end contains the gasket)
You can hacksaw the metal, but I used a metal cut off wheel. After cutting, you need to file the cutting edge to insure it is smooth and even. My round chainsaw file helped clean up the round inside portion.
You can hacksaw the metal, but I used a metal cut off wheel. After cutting, you need to file the cutting edge to insure it is smooth and even. My round chainsaw file helped clean up the round inside portion.
You may have to make one or two cuts depending on your unique setting.

In the process of being torqued to specs

WARNING :This article is for educational purposes; I am just relating my personal experiences. I believe the information given to be accurate, but should not be used as an instructional manual. You should follow the manufacturer's directions and comply with all local codes. Your level of expertise and educational credentials/certifications may vary. When you are not confident, why not let a professional HVAC person do the installation?
EducationDx
©2025
©2025

This boiler installation is about the WM CGi 4, which is a
The WM manual lists four manufacturers: FasNSeal, Saf-T Vent, Z Vent II, and StaR-34.
I chose the
direct vent
boiler, i.e., vents directly to the outside via sealed stainless steel vent piping rather than up a chimney. The WM Boiler manual states to "select a vent pipe manufacturer and obtain all vent components needed..." and "you must use the vent starter made by the vent manufacturer." The manual further states, "do not mix components from different systems."The WM manual lists four manufacturers: FasNSeal, Saf-T Vent, Z Vent II, and StaR-34.
I chose the
Z-Vent
for this application


Z-Vent WM Cgi Vent starter collar, strapped and sealed with Z Vent sealant


The Z Vent has a band on the female end that tightens the sections together. The screw has to be torqued to specs.
I used my torque screwdriver with a hex head nut driver fitting to achieve the specs. The instructions state a range: 40 in/lbs to 50 in/lbs.
I used my torque screwdriver with a hex head nut driver fitting to achieve the specs. The instructions state a range: 40 in/lbs to 50 in/lbs.
Female
End
End
Male
End
End

Cut


Education Dx
A Free Information Website

>>PHOTOS and ILLUSTRATIONS on this site<<
Installing a Venting System on the WM Boiler
Selecting a Venting System

This boiler installation is about the WM CGi 4, which is a
The WM manual lists four manufacturers: FasNSeal, Saf-T Vent, Z Vent II, and StaR-34.
I chose the
direct vent
boiler, i.e., vents directly to the outside via sealed stainless steel vent piping rather than up a chimney. The WM Boiler manual states to "select a vent pipe manufacturer and obtain all vent components needed..." and "you must use the vent starter made by the vent manufacturer." The manual further states, "do not mix components from different systems."The WM manual lists four manufacturers: FasNSeal, Saf-T Vent, Z Vent II, and StaR-34.
I chose the
Z-Vent
for this application
Materials=Check
Tools=Check
Pipe=It's here, but not in this photo
Tools=Check
Pipe=It's here, but not in this photo


The starting collar base is the only place that the Z Vent will be installed with the Z Vent Sealant. All the other sections have built-in gaskets that only require a light coating of Versalube Silicone Compound.
Z-Vent WM Cgi Vent starter collar, strapped and sealed with Z Vent sealant
Planning, measuring and orienting the Z Vent (a dry fit)
The venting requires a 1/4" per foot rise, and the small pieces of rope helped hold the pipe temporarily in the approximate position. Also, doing this solo probably prevented any helper from any harm!


Cut
Male
End
End

Female
End
End
You may have to make one or two cuts depending on your unique setting.
Cutting the Z Vent was relatively easy. After measuring "twice"--you wrap a sheet of paper around the pipe to keep it even, then just trace the top of the paper with a perm pen marker. (cut male end ONLY, the female end contains the gasket)
You can hacksaw the metal, but I used a metal cut off wheel. After cutting, you need to file the cutting edge to insure it is smooth and even. My round chainsaw file helped clean up the round inside portion.
You can hacksaw the metal, but I used a metal cut off wheel. After cutting, you need to file the cutting edge to insure it is smooth and even. My round chainsaw file helped clean up the round inside portion.

In the process of being torqued to specs

The Z Vent has a band on the female end that tightens the sections together. The screw has to be torqued to specs.
I used my torque screwdriver with a hex head nut driver fitting to achieve the specs. The instructions state a range: 40 in/lbs to 50 in/lbs.
I used my torque screwdriver with a hex head nut driver fitting to achieve the specs. The instructions state a range: 40 in/lbs to 50 in/lbs.
WARNING :This article is for educational purposes; I am just relating my personal experiences. I believe the information given to be accurate, but should not be used as an instructional manual. You should follow the manufacturer's directions and comply with all local codes. Your level of expertise and educational credentials/certifications may vary. When you are not confident, why not let a professional HVAC person do the installation?
EducationDx
©2025
©2025
*Disclosure: Some links on this website are associate links and are used to help illustrate what an item looks like, and you can decide if you want to just look or purchase the item. "As an Amazon Associate, I earn from qualifying purchases." We receive a small commission (that helps support this website) if you actually purchase from this company, but the price to you remains the same.
You can hover over any link to see if it is an Amazon link, if this matters, or a link to a page on this website or to a reference page, e.g., Smithsonian Institution, bookmark on this website, etc.
You can hover over any link to see if it is an Amazon link, if this matters, or a link to a page on this website or to a reference page, e.g., Smithsonian Institution, bookmark on this website, etc.
Direct Vent or Atmospheric Vent
Sponsored Link
Sponsored Link