

Refrigerator Parts: Repair and Replace

www.EducationDx.com


Next
>>>Finishing
>>>Finishing

Admiral Refrigerator Parts Amana Refrigerator Parts Caloric Refrigerator Parts Electrolux Refrigerator Parts Frigidaire Refrigerator Parts GE Refrigerator Parts Hotpoint Refrigerator Parts Jenn-Air Refrigerator Parts Kenmore Refrigerator Parts (Sears) KitchenAid Refrigerator Parts Magic Chef Refrigerator Parts Maytag Refrigerator Parts Roper Refrigerator Parts Tappan Refrigerator Parts Whirlpool Refrigerator Parts White-Westinghouse Refrigerator Parts
Parts
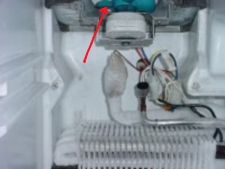
Observe all refrigerator parts including the freezer fan when you start to defrost and remove the freezer (inside) rear panels. (While everything is frosted.)
The freezer fan looks okay in this photo. I plugged the refrigerator back in after removing the panels (for a few seconds) and observed the fan turning freely. Keep your fingers out of here while plugged in!
Use safety glasses!
The freezer fan looks okay in this photo. I plugged the refrigerator back in after removing the panels (for a few seconds) and observed the fan turning freely. Keep your fingers out of here while plugged in!
Use safety glasses!
Note the blue rubber fan blade near the top


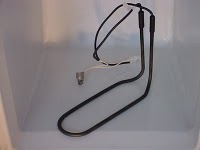
New Defrost Heater Element w/thermo
To make this diagnosis, you probably already removed the panels described in the next section. I will recap the removal procedure for those who may not have done that, but have a good idea that this is the problem.
The directions for removing the bucket are stamped on the ice maker bucket (front lip underneath) (just remove the bucket and front piece, no more!) Don't try to take the whole bracket out! This is better than dealing with a bucket of water later or trapped ice cubes melting on your head
Ice Maker and Bucket
Sometimes ice can form on the fan or fan motor, and of course, prevents the fan from turning. This would mean that no air could flow from the freezer compartment to the refrigerator compartment through the freezer diverter and/or damper. If there is ice here, your refrigerator isn't defrosting properly!
Also, the fan motor may be defective (not just ice-jammed) and needs replaced. Note: Your problem is probably with the defrost parts, not the fan/motor. OBSERVE!
Also, the fan motor may be defective (not just ice-jammed) and needs replaced. Note: Your problem is probably with the defrost parts, not the fan/motor. OBSERVE!


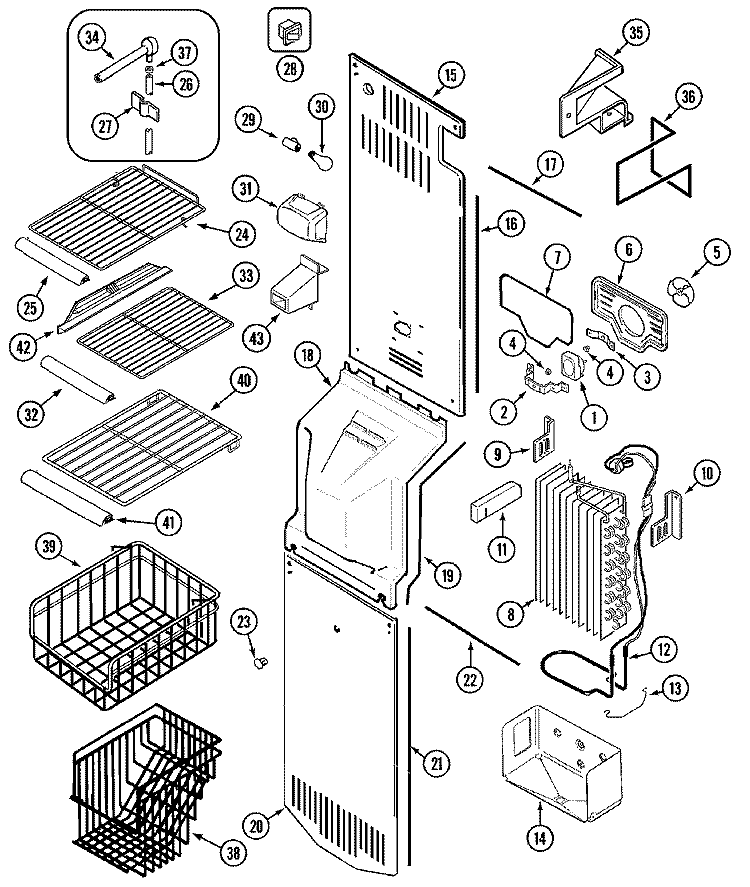
Inside of the freezer compartment, remove the very bottom panel by removing three hex screws on the panel (see #20 in freezer diagram) and by loosening the two hex screws on the middle panel (see #19 in freezer diagram). Carefully wiggle the middle panel out. Do not remove the top panel. (see #15 in freezer diagram).
Freezer Diagram
(right click to enlarge)
The bottom panel (see #20 in freezer diagram) may be frozen to the coils, so gently and slowly pull the cover off. Be careful not to damage the foam insulation on the back of the panel.
Give the heat some time to start melting the ice (see "Patience Isn't..." below).
Give the heat some time to start melting the ice (see "Patience Isn't..." below).

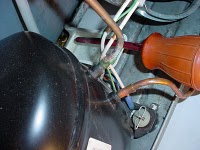
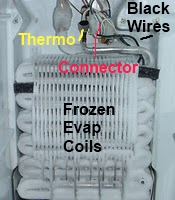
You should see the ice covered coils. The defrost heater (black) wires and fuses (2) are intertwined through the coils (right side with you facing the coils) and are connected to the defrost thermostat in a series to an adapter plug, a one-way plastic connector (top-middle-right of photo). Note the two black wires going to the connector and thermostat (aluminum with black top in center of photo.)
Ice covered evaporator coils
Set up a pan inside the freezer compartment to collect the melting ice water. Depending on how much the coils are iced, you may get 1-2 quarts of water. Use aluminum foil to make a funnel to by-pass the trough and drain under the freezer coils. DO NOT pick or pry the ice from these coils. You can damage the wires and the coils by trying to speed up the melting process. Open the refrigerator doors and let the heat do the job!

Pan to collect melting ice water
Even though you will try to prevent the water from going in the drain trough (see #14 in freezer diagram), some will go down anyhow. Have a suction bulb ready to suction water from the pan in the rear so that it won’t overflow.
Since the refrigerator isn’t running, the usual method of evaporation of water will not occur, since no fan is blowing air across the pan and the amount of melting ice is increased.
Since the refrigerator isn’t running, the usual method of evaporation of water will not occur, since no fan is blowing air across the pan and the amount of melting ice is increased.
Suction any water from the evaporator tray
(little white tray)
(little white tray)
PATIENCE ISN'T ONE OF MY VIRTUES!
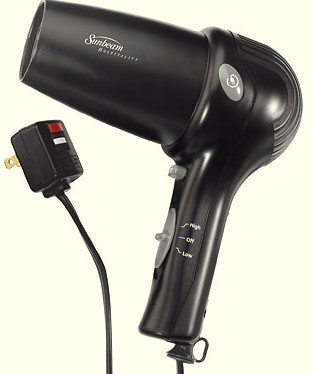
You can speed up the process by using a hair dryer (w/gfci) to blow warm air across the frozen coils. This will speed up the defrost, but creates a lot of water in a short time.
Do NOT leave any warming device unattended! Don't touch the coils or ice/water with the hair dryer!!!
You can speed up the process by using a hair dryer (w/gfci) to blow warm air across the frozen coils. This will speed up the defrost, but creates a lot of water in a short time.
Do NOT leave any warming device unattended! Don't touch the coils or ice/water with the hair dryer!!!


Note: Most new hair dryers have a built-in GFCI, a personal protection device.
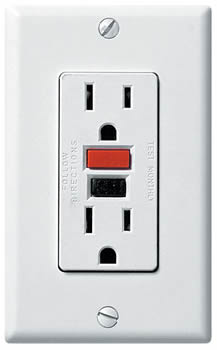
Most modern kitchens have GFCI outlets near the counter tops. WARNING: Be careful when using electrical appliances around water and make sure you are using a GFCI!


Refrigerator Parts: Repair and Replace
Heater, Thermostat, Timer/Adaptive Defrost Control
If your refrigerator freezer compartment is cold, but the refrigerator compartment is warm--It could be a defrost problem.
>>>PHOTOS and ILLUSTRATIONS on this site<<<
If your refrigerator freezer compartment is cold, but the refrigerator compartment is warm--It could be a defrost problem.
>>>PHOTOS and ILLUSTRATIONS on this site<<<

www.EducationDx.com
This is a FREE information site!
Part of EdDx Educational Series
Part of EdDx Educational Series


Sponsored Links

EducationDx
©2012
©2012

Next
>>>Finishing
>>>Finishing

Admiral Refrigerator Parts Amana Refrigerator Parts Caloric Refrigerator Parts Electrolux Refrigerator Parts Frigidaire Refrigerator Parts GE Refrigerator Parts Hotpoint Refrigerator Parts Jenn-Air Refrigerator Parts Kenmore Refrigerator Parts (Sears) KitchenAid Refrigerator Parts Magic Chef Refrigerator Parts Maytag Refrigerator Parts Roper Refrigerator Parts Tappan Refrigerator Parts Whirlpool Refrigerator Parts White-Westinghouse Refrigerator Parts
Parts

Observe all refrigerator parts including the freezer fan when you start to defrost and remove the freezer (inside) rear panels. (While everything is frosted.)
The freezer fan looks okay in this photo. I plugged the refrigerator back in after removing the panels (for a few seconds) and observed the fan turning freely. Keep your fingers out of here while plugged in!
Use safety glasses!
The freezer fan looks okay in this photo. I plugged the refrigerator back in after removing the panels (for a few seconds) and observed the fan turning freely. Keep your fingers out of here while plugged in!
Use safety glasses!
Note the blue rubber fan blade near the top


New Defrost Heater Element w/thermo
To make this diagnosis, you probably already removed the panels described in the next section. I will recap the removal procedure for those who may not have done that, but have a good idea that this is the problem.
The directions for removing the bucket are stamped on the ice maker bucket (front lip underneath) (just remove the bucket and front piece, no more!) Don't try to take the whole bracket out! This is better than dealing with a bucket of water later or trapped ice cubes melting on your head
Ice Maker and Bucket


Inside of the freezer compartment, remove the very bottom panel by removing three hex screws on the panel (see #20 in freezer diagram) and by loosening the two hex screws on the middle panel (see #19 in freezer diagram). Carefully wiggle the middle panel out. Do not remove the top panel. (see #15 in freezer diagram).
Freezer Diagram
(right click to enlarge)
The bottom panel (see #20 in freezer diagram) may be frozen to the coils, so gently and slowly pull the cover off. Be careful not to damage the foam insulation on the back of the panel.
Give the heat some time to start melting the ice (see "Patience Isn't..." below).
Give the heat some time to start melting the ice (see "Patience Isn't..." below).

You should see the ice covered coils. The defrost heater (black) wires and fuses (2) are intertwined through the coils (right side with you facing the coils) and are connected to the defrost thermostat in a series to an adapter plug, a one-way plastic connector (top-middle-right of photo). Note the two black wires going to the connector and thermostat (aluminum with black top in center of photo.)

Ice covered evaporator coils
Set up a pan inside the freezer compartment to collect the melting ice water. Depending on how much the coils are iced, you may get 1-2 quarts of water. Use aluminum foil to make a funnel to by-pass the trough and drain under the freezer coils. DO NOT pick or pry the ice from these coils. You can damage the wires and the coils by trying to speed up the melting process. Open the refrigerator doors and let the heat do the job!
Pan to collect melting ice water
Even though you will try to prevent the water from going in the drain trough (see #14 in freezer diagram), some will go down anyhow. Have a suction bulb ready to suction water from the pan in the rear so that it won’t overflow.
Since the refrigerator isn’t running, the usual method of evaporation of water will not occur, since no fan is blowing air across the pan and the amount of melting ice is increased.
Since the refrigerator isn’t running, the usual method of evaporation of water will not occur, since no fan is blowing air across the pan and the amount of melting ice is increased.
Suction any water from the evaporator tray
(little white tray)
(little white tray)
PATIENCE ISN'T ONE OF MY VIRTUES!
You can speed up the process by using a hair dryer (w/gfci) to blow warm air across the frozen coils. This will speed up the defrost, but creates a lot of water in a short time.
Do NOT leave any warming device unattended! Don't touch the coils or ice/water with the hair dryer!!!
You can speed up the process by using a hair dryer (w/gfci) to blow warm air across the frozen coils. This will speed up the defrost, but creates a lot of water in a short time.
Do NOT leave any warming device unattended! Don't touch the coils or ice/water with the hair dryer!!!

Note: Most new hair dryers have a built-in GFCI, a personal protection device.
Most modern kitchens have GFCI outlets near the counter tops. WARNING: Be careful when using electrical appliances around water and make sure you are using a GFCI!


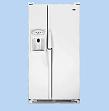
Remember, the model illustrated here is a Maytag wide-by-side, but other units may be similar, since some appliances are made by the same manufacturer under different brand names. The job is relatively simple, and can be done with little experience, if you are good at following directions, like unplugging the refrigerator BEFORE you start. If you have a digital camera, this is the time to take some detailed photos to help your memory when you are reinstalling parts!
At this point, you probably unplugged your refrigerator to begin the manual defrost. Clear the inside of the freezer section of all shelves and the ice maker bucket assembly. The ice maker bucket assembly won’t get in the way, but it snaps right out (no screws or bolts to take out), and you can dump the ice cubes in the sink or the bag inside the bag you will use for storing your refrigerator food--temporarily.
At this point, you probably unplugged your refrigerator to begin the manual defrost. Clear the inside of the freezer section of all shelves and the ice maker bucket assembly. The ice maker bucket assembly won’t get in the way, but it snaps right out (no screws or bolts to take out), and you can dump the ice cubes in the sink or the bag inside the bag you will use for storing your refrigerator food--temporarily.

Remember to use: 1/4" hex nut socket and driver (Do not use electric drills or power screwdrivers!)


This is a FREE information site!
Part of EdDx Educational Series
Part of EdDx Educational Series

www.EducationDx.com
Refrigerator Parts
Repair and Replace
Repair and Replace Refrigerator Parts


This is a FREE information site!
Part of EdDx Educational Series
Part of EdDx Educational Series


Remember to use: 1/4" hex nut socket and driver (Do not use electric drills or power screwdrivers!)
Sometimes ice can form on the fan or fan motor, and of course, prevents the fan from turning. This would mean that no air could flow from the freezer compartment to the refrigerator compartment through the freezer diverter and/or damper. If there is ice here, your refrigerator isn't defrosting properly!
Also, the fan motor may be defective (not just ice-jammed) and needs replaced. Note: Your problem is probably with the defrost parts, not the fan/motor. OBSERVE!
Also, the fan motor may be defective (not just ice-jammed) and needs replaced. Note: Your problem is probably with the defrost parts, not the fan/motor. OBSERVE!
After you complete your diagnosis by eliminating the above-mentioned problems and ruling out the ADC/Timer, the next step is to replace the defrost heating element with an assembly (kit) that includes a new defrost thermostat.

After you complete your diagnosis by eliminating the above-mentioned problems and ruling out the ADC/Timer, the next step is to replace the defrost heating element with an assembly (kit) that includes a new defrost thermostat.
Remember, the model illustrated here is a Maytag wide-by-side, but other units may be similar, since some appliances are made by the same manufacturer under different brand names. The job is relatively simple, and can be done with little experience, if you are good at following directions, like unplugging the refrigerator BEFORE you start. If you have a digital camera, this is the time to take some detailed photos to help your memory when you are reinstalling parts!
At this point, you probably unplugged your refrigerator to begin the manual defrost. Clear the inside of the freezer section of all shelves and the ice maker bucket assembly. The ice maker bucket assembly won’t get in the way, but it snaps right out (no screws or bolts to take out), and you can dump the ice cubes in the sink or the bag inside the bag you will use for storing your refrigerator food--temporarily.
At this point, you probably unplugged your refrigerator to begin the manual defrost. Clear the inside of the freezer section of all shelves and the ice maker bucket assembly. The ice maker bucket assembly won’t get in the way, but it snaps right out (no screws or bolts to take out), and you can dump the ice cubes in the sink or the bag inside the bag you will use for storing your refrigerator food--temporarily.

Note: Larger computer screens will show larger materials!
Observe all refrigerator parts including the freezer fan when you start to defrost and remove the freezer (inside) rear panels. (While everything is frosted.)
The freezer fan looks okay in this photo. I plugged the refrigerator back in after removing the panels (for a few seconds) and observed the fan turning freely. Keep your fingers out of here while plugged in!
Use safety glasses!
The freezer fan looks okay in this photo. I plugged the refrigerator back in after removing the panels (for a few seconds) and observed the fan turning freely. Keep your fingers out of here while plugged in!
Use safety glasses!
Note the blue rubber fan blade near the top
Sometimes ice can form on the fan or fan motor, and of course, prevents the fan from turning. This would mean that no air could flow from the freezer compartment to the refrigerator compartment through the freezer diverter and/or damper. If there is ice here, your refrigerator isn't defrosting properly!
Also, the fan motor may be defective (not just ice-jammed) and needs replaced. Note: Your problem is probably with the defrost parts, not the fan/motor. OBSERVE!
Also, the fan motor may be defective (not just ice-jammed) and needs replaced. Note: Your problem is probably with the defrost parts, not the fan/motor. OBSERVE!

After you complete your diagnosis by eliminating the above-mentioned problems and ruling out the ADC/Timer, the next step is to replace the defrost heating element with an assembly (kit) that includes a new defrost thermostat.
New Defrost Heater Element w/thermo
To make this diagnosis, you probably already removed the panels described in the next section. I will recap the removal procedure for those who may not have done that, but have a good idea that this is the problem.
Remember, the model illustrated here is a Maytag wide-by-side, but other units may be similar, since some appliances are made by the same manufacturer under different brand names. The job is relatively simple, and can be done with little experience, if you are good at following directions, like unplugging the refrigerator BEFORE you start. If you have a digital camera, this is the time to take some detailed photos to help your memory when you are reinstalling parts!
At this point, you probably unplugged your refrigerator to begin the manual defrost. Clear the inside of the freezer section of all shelves and the ice maker bucket assembly. The ice maker bucket assembly won’t get in the way, but it snaps right out (no screws or bolts to take out), and you can dump the ice cubes in the sink or the bag inside the bag you will use for storing your refrigerator food--temporarily.
At this point, you probably unplugged your refrigerator to begin the manual defrost. Clear the inside of the freezer section of all shelves and the ice maker bucket assembly. The ice maker bucket assembly won’t get in the way, but it snaps right out (no screws or bolts to take out), and you can dump the ice cubes in the sink or the bag inside the bag you will use for storing your refrigerator food--temporarily.
Ice Maker and Bucket
The directions for removing the bucket are stamped on the ice maker bucket (front lip underneath) (just remove the bucket and front piece, no more!) Don't try to take the whole bracket out! This is better than dealing with a bucket of water later or trapped ice cubes melting on your head
Inside of the freezer compartment, remove the very bottom panel by removing three hex screws on the panel (see #20 in freezer diagram) and by loosening the two hex screws on the middle panel (see #19 in freezer diagram). Carefully wiggle the middle panel out. Do not remove the top panel. (see #15 in freezer diagram).
Freezer Diagram
(right click to enlarge)
Remember to use: 1/4" hex nut socket and driver (Do not use electric drills or power screwdrivers!)
The bottom panel (see #20 in freezer diagram) may be frozen to the coils, so gently and slowly pull the cover off. Be careful not to damage the foam insulation on the back of the panel.
Give the heat some time to start melting the ice (see "Patience Isn't..." below).
Give the heat some time to start melting the ice (see "Patience Isn't..." below).


You should see the ice covered coils. The defrost heater (black) wires and fuses (2) are intertwined through the coils (right side with you facing the coils) and are connected to the defrost thermostat in a series to an adapter plug, a one-way plastic connector (top-middle-right of photo). Note the two black wires going to the connector and thermostat (aluminum with black top in center of photo.)
Ice covered evaporator coils
Set up a pan inside the freezer compartment to collect the melting ice water. Depending on how much the coils are iced, you may get 1-2 quarts of water. Use aluminum foil to make a funnel to by-pass the trough and drain under the freezer coils. DO NOT pick or pry the ice from these coils. You can damage the wires and the coils by trying to speed up the melting process. Open the refrigerator doors and let the heat do the job!
Pan to collect melting ice water
Even though you will try to prevent the water from going in the drain trough (see #14 in freezer diagram), some will go down anyhow. Have a suction bulb ready to suction water from the pan in the rear so that it won’t overflow.
Since the refrigerator isn’t running, the usual method of evaporation of water will not occur, since no fan is blowing air across the pan and the amount of melting ice is increased.
Since the refrigerator isn’t running, the usual method of evaporation of water will not occur, since no fan is blowing air across the pan and the amount of melting ice is increased.
Suction any water from the evaporator tray
(little white tray)
(little white tray)


PATIENCE ISN'T ONE OF MY VIRTUES!
You can speed up the process by using a hair dryer (w/gfci) to blow warm air across the frozen coils. This will speed up the defrost, but creates a lot of water in a short time.
Do NOT leave any warming device unattended! Don't touch the coils or ice/water with the hair dryer!!!
You can speed up the process by using a hair dryer (w/gfci) to blow warm air across the frozen coils. This will speed up the defrost, but creates a lot of water in a short time.
Do NOT leave any warming device unattended! Don't touch the coils or ice/water with the hair dryer!!!

Note: Most new hair dryers have a built-in GFCI, a personal protection device.
Most modern kitchens have GFCI outlets near the counter tops. WARNING: Be careful when using electrical appliances around water and make sure you are using a GFCI!
Next
>>>Finishing
>>>Finishing


Disclosure:
Some links on this website are associate links and are used to help illustrate what an item looks like, and you can decide if you want to just look or purchase the item. "As an Amazon Associate, I earn from qualifying purchases." We receive a small commission (that helps support this website) if you actually purchase from this company, but the price to you remains the same.
You can hover over any link to see if it is an Amazon link, if this matters, or a link to a page on this website or to a reference page, e.g., Smithsonian Institution, bookmark on this website, etc.
EducationDx
©2017, 2023
©2017, 2023