

Refrigerator Parts: Install

www.EducationDx.com

EducationDx
©2017
©2017


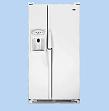
Admiral Refrigerator Parts Amana Refrigerator Parts Caloric Refrigerator Parts Electrolux Refrigerator Parts Frigidaire Refrigerator Parts GE Refrigerator Parts Hotpoint Refrigerator Parts Jenn-Air Refrigerator Parts Kenmore Refrigerator Parts (Sears) KitchenAid Refrigerator Parts Magic Chef Refrigerator Parts Maytag Refrigerator Parts Roper Refrigerator Parts Tappan Refrigerator Parts Whirlpool Refrigerator Parts White-Westinghouse Refrigerator Parts
Parts
"A PICTURE IS WORTH A THOUSAND WORDS"

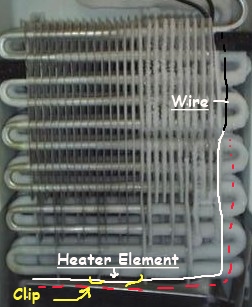
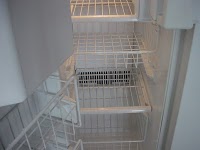
View of Freezer Department--Heater element (illustrated) in red--Plastic connector at the top
After all of the ice melts and you have dried the interior of the freezer with a cloth, inspect the wires and note how they are threaded through the coils. Take a photo if you are not sure or draw a diagram on paper.
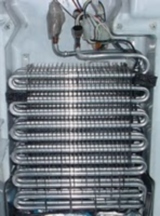
Note the position of the wires
This view is inside the freezer with the door open
Above the coil
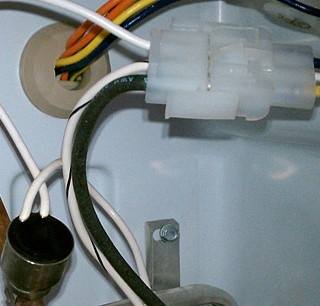
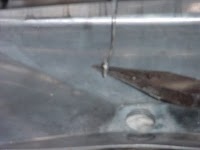
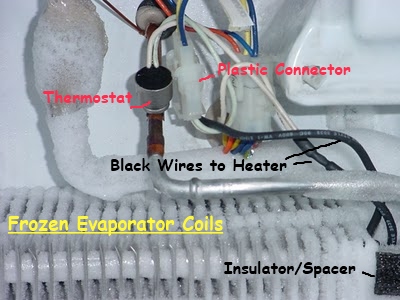
Plastic Harness Connector
Hold the male plastic connector section with one hand and the female plastic connector section with the other, then pull. The plastic connector is keyed so that it only goes in and out one way, so you don’t have to worry about the wire position.
This is another close-up of the connection. Also: see the Testing section for more photos of the connector.
This is another close-up of the connection. Also: see the Testing section for more photos of the connector.
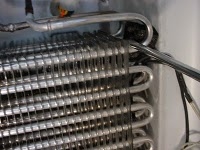
Under the coil
A small metal retainer clip holds the bottom of the refrigerator defrost heater element to the coil. Use needle-nose pliers to grasp the front and pulled the top part towards you. Remember how this is held in place so that you can replace it. The refrigerator defrost heating element should drop down. Slowly unweave the wire from the coil.
FINALLY--
INSTALLING THE NEW PARTS
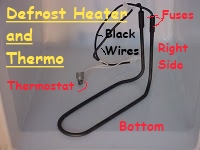
To install the new refrigerator defrost heater assembly, reverse the steps that you just did in taking the old one out. Thread the wires through and around the coil and be careful not to cut the black wire insulation on the air fins of the coil. Make sure the connector plug has enough slack to reach the wiring harness and thermostat without stretching. Check to make sure the black wires run through the holes cut in the black insulator/spacer at the top right side of the coil.
Snap the metal retainer (coil) clip, that holds the heater element, to the bottom of the coil. Make sure the defrost heater element is under the coils and will not touch the rear freezer wall or front metal panel when replaced.
Snap the connector plug to the refrigerator wiring harness. Remember, it is keyed and can only go in one way. Snap the thermostat (with clip) on the tubing. Check your work to see that it is neat and no parts are sticking out.
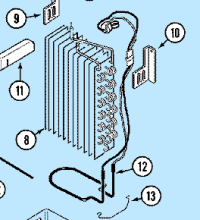
Threading the heater element wire through the coils
Evaporator Coils
Evaporator Coils


<<<Return to the First Page


This is a FREE information site!
Part of EdDx Educational Series
Part of EdDx Educational Series


Coil Clip held with Needle-Nose Pliers
Replace the panels, shelves and ice maker bucket. Replace the black cardboard rear panel cover and put the refrigerator plug in the electrical outlet.
Check your refrigerator stand alone thermometer. Depending on your settings, the refrigerator temperature should return to normal (37-41º F) in the refrigerator section and 0-10º F in the freezer in a few hours. The EPA recommends keeping refrigerators at 37º F and freezers at 3º F.
Check your refrigerator stand alone thermometer. Depending on your settings, the refrigerator temperature should return to normal (37-41º F) in the refrigerator section and 0-10º F in the freezer in a few hours. The EPA recommends keeping refrigerators at 37º F and freezers at 3º F.
This photo shows the coils still iced. This is to illustate only--of course you will melt the ice and dry before installing!!!!

Refrigerator Parts: Install

www.EducationDx.com
EducationDx
©2017, 2023
©2017, 2023


Admiral Refrigerator Parts Amana Refrigerator Parts Caloric Refrigerator Parts Electrolux Refrigerator Parts Frigidaire Refrigerator Parts GE Refrigerator Parts Hotpoint Refrigerator Parts Jenn-Air Refrigerator Parts Kenmore Refrigerator Parts (Sears) KitchenAid Refrigerator Parts Magic Chef Refrigerator Parts Maytag Refrigerator Parts Roper Refrigerator Parts Tappan Refrigerator Parts Whirlpool Refrigerator Parts White-Westinghouse Refrigerator Parts
Parts
"A PICTURE IS WORTH A THOUSAND WORDS"
View of Freezer Department--Heater element (illustrated) in red--Plastic connector at the top
After all of the ice melts and you have dried the interior of the freezer with a cloth, inspect the wires and note how they are threaded through the coils. Take a photo if you are not sure or draw a diagram on paper.
Note the position of the wires
This view is inside the freezer with the door open
Above the coil
Plastic Harness Connector
Hold the male plastic connector section with one hand and the female plastic connector section with the other, then pull. The plastic connector is keyed so that it only goes in and out one way, so you don’t have to worry about the wire position.
This is another close-up of the connection. Also: see the Testing section for more photos of the connector.
This is another close-up of the connection. Also: see the Testing section for more photos of the connector.
Under the coil
A small metal retainer clip holds the bottom of the refrigerator defrost heater element to the coil. Use needle-nose pliers to grasp the front and pulled the top part towards you. Remember how this is held in place so that you can replace it. The refrigerator defrost heating element should drop down. Slowly unweave the wire from the coil.
FINALLY--
INSTALLING THE NEW PARTS
To install the new refrigerator defrost heater assembly, reverse the steps that you just did in taking the old one out. Thread the wires through and around the coil and be careful not to cut the black wire insulation on the air fins of the coil. Make sure the connector plug has enough slack to reach the wiring harness and thermostat without stretching. Check to make sure the black wires run through the holes cut in the black insulator/spacer at the top right side of the coil.
Snap the metal retainer (coil) clip, that holds the heater element, to the bottom of the coil. Make sure the defrost heater element is under the coils and will not touch the rear freezer wall or front metal panel when replaced.
Snap the connector plug to the refrigerator wiring harness. Remember, it is keyed and can only go in one way. Snap the thermostat (with clip) on the tubing. Check your work to see that it is neat and no parts are sticking out.
Snap the metal retainer (coil) clip, that holds the heater element, to the bottom of the coil. Make sure the defrost heater element is under the coils and will not touch the rear freezer wall or front metal panel when replaced.
Snap the connector plug to the refrigerator wiring harness. Remember, it is keyed and can only go in one way. Snap the thermostat (with clip) on the tubing. Check your work to see that it is neat and no parts are sticking out.
Threading the heater element wire through the coils
Evaporator Coils
Evaporator Coils


<<<Return to the First Page


This is a FREE information site!
Part of EdDx Educational Series
Part of EdDx Educational Series

To remove the refrigerator defrost heater element assembly, unplug the plastic connector at the top of the coils (near the thermostat) by squeezing the connector lock handles with your index finger and thumb while gently wiggling the connector. Do not pull by holding the wires!
Coil Clip held with Needle-Nose Pliers
Replace the panels, shelves and ice maker bucket. Replace the black cardboard rear panel cover and put the refrigerator plug in the electrical outlet.
Check your refrigerator stand alone thermometer. Depending on your settings, the refrigerator temperature should return to normal (37-41º F) in the refrigerator section and 0-10º F in the freezer in a few hours. The EPA recommends keeping refrigerators at 37º F and freezers at 3º F.
Check your refrigerator stand alone thermometer. Depending on your settings, the refrigerator temperature should return to normal (37-41º F) in the refrigerator section and 0-10º F in the freezer in a few hours. The EPA recommends keeping refrigerators at 37º F and freezers at 3º F.
This photo shows the coils still iced. This is to illustate only--of course you will melt the ice and dry before installing!!!!
To remove the refrigerator defrost heater element assembly, unplug the plastic connector at the top of the coils (near the thermostat) by squeezing the connector lock handles with your index finger and thumb while gently wiggling the connector. Do not pull by holding the wires!


This is a FREE information site!
Part of EdDx Educational Series
Part of EdDx Educational Series

www.EducationDx.com
Note: Larger computer screens will show larger materials!
Refrigerator Parts
Installing Parts
Installing Refrigerator Parts

"A PICTURE IS WORTH A THOUSAND WORDS"
This view is inside the freezer with the door open
View of Freezer Department--Heater element (illustrated) in red--Plastic connector at the top

After all of the ice melts and you have dried the interior of the freezer with a cloth, inspect the wires and note how they are threaded through the coils. Take a photo if you are not sure or draw a diagram on paper.

Evaporator Coils
Note the position of the wires
Above the coil
Plastic Harness Connector

Hold the male plastic connector section with one hand and the female plastic connector section with the other, then pull. The plastic connector is keyed so that it only goes in and out one way, so you don’t have to worry about the wire position.
This is another close-up of the connection. Also: see the Testing section for more photos of the connector.
This is another close-up of the connection. Also: see the Testing section for more photos of the connector.

Evaporator Coils
These photos show the coils still iced. This is to illustate only--of course you will melt the ice before removing and dry before installing!!!!
A small metal retainer clip holds the bottom of the refrigerator defrost heater element to the coil. Use needle-nose pliers to grasp the front and pulled the top part towards you. Remember how this is held in place so that you can replace it. The refrigerator defrost heating element should drop down. Slowly unweave the wire from the coil.
Under the coil


FINALLY--
INSTALLING THE NEW PARTS
To install the new refrigerator defrost heater assembly, reverse the steps that you just did in taking the old one out. Thread the wires through and around the coil and be careful not to cut the black wire insulation on the air fins of the coil. Make sure the connector plug has enough slack to reach the wiring harness and thermostat without stretching. Check to make sure the black wires run through the holes cut in the black insulator/spacer at the top right side of the coil.
Snap the metal retainer (coil) clip, that holds the heater element, to the bottom of the coil. Make sure the defrost heater element is under the coils and will not touch the rear freezer wall or front metal panel when replaced.
Snap the connector plug to the refrigerator wiring harness. Remember, it is keyed and can only go in one way. Snap the thermostat (with clip) on the tubing. Check your work to see that it is neat and no parts are sticking out.
Snap the metal retainer (coil) clip, that holds the heater element, to the bottom of the coil. Make sure the defrost heater element is under the coils and will not touch the rear freezer wall or front metal panel when replaced.
Snap the connector plug to the refrigerator wiring harness. Remember, it is keyed and can only go in one way. Snap the thermostat (with clip) on the tubing. Check your work to see that it is neat and no parts are sticking out.

Threading the heater element wire through the coils


Coil Clip held with Needle-Nose Pliers


Okay--We're Almost Finished!
EducationDx
©2017, 2023
©2017, 2023
<<<Return to the First Page
Replace the panels, shelves and ice maker bucket. Replace the black cardboard rear panel cover and put the refrigerator plug in the electrical outlet.
Check your refrigerator stand alone thermometer. Depending on your settings, the refrigerator temperature should return to normal (37-41º F) in the refrigerator section and 0-10º F in the freezer in a few hours. The EPA recommends keeping refrigerators at 37º F and freezers at 3º F.
Check your refrigerator stand alone thermometer. Depending on your settings, the refrigerator temperature should return to normal (37-41º F) in the refrigerator section and 0-10º F in the freezer in a few hours. The EPA recommends keeping refrigerators at 37º F and freezers at 3º F.

(right click to enlarge)

Disclosure:
Some links on this website are associate links and are used to help illustrate what an item looks like, and you can decide if you want to just look or purchase the item. "As an Amazon Associate, I earn from qualifying purchases." We receive a small commission (that helps support this website) if you actually purchase from this company, but the price to you remains the same.
You can hover over any link to see if it is an Amazon link, if this matters, or a link to a page on this website or to a reference page, e.g., Smithsonian Institution, bookmark on this website, etc.

To remove the refrigerator defrost heater element assembly, unplug the plastic connector at the top of the coils (near the thermostat) by squeezing the connector lock handles with your index finger and thumb while gently wiggling the connector. Do not pull by holding the wires!
Disclosure:
Some links on this website are associate links and are used to help illustrate what an item looks like, and you can decide if you want to just look or purchase the item. "As an Amazon Associate, I earn from qualifying purchases." We receive a small commission (that helps support this website) if you actually purchase from this company, but the price to you remains the same.
You can hover over any link to see if it is an Amazon link, if this matters, or a link to a page on this website or to a reference page, e.g., Smithsonian Institution, bookmark on this website, etc.
Some links on this website are associate links and are used to help illustrate what an item looks like, and you can decide if you want to just look or purchase the item. "As an Amazon Associate, I earn from qualifying purchases." We receive a small commission (that helps support this website) if you actually purchase from this company, but the price to you remains the same.
You can hover over any link to see if it is an Amazon link, if this matters, or a link to a page on this website or to a reference page, e.g., Smithsonian Institution, bookmark on this website, etc.