


www.EducationDx.com
This is a FREE information site!
Part of EdDx Educational Series
Part of EdDx Educational Series


Next>>>


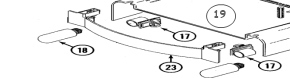
Remove the two light bulbs (#18) from the sockets (#17).
There are two keyhole slots that will allow the heat shield (#19) to move then drop after removing the two hex head screws. This should allow you to remove the dial face (#23) from the heat shield.
Just remove the dial face, NOT the arms (#4 & 5).
Some models have two additional Phillips head screws near (above) the light sockets in the heat shield (remove them), and one hex screw on the d/t control housing (#1) rear wall near the top.

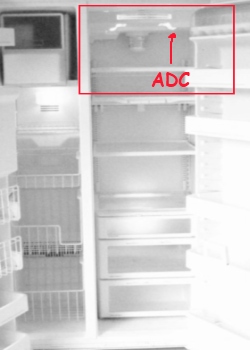
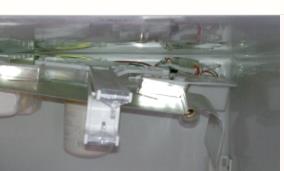
Inside the refrigerator compartment with the heat shield and damper/temperature control panel housing pulled down for illustration. Some models allow this flexibility--some are not this forgiving!
Here's what you find here: ADC info, photos. diagrams, step-by-step instructions on how to replace an ADC.
Adaptive Defrost Control Repair
>>>PHOTOS and ILLUSTRATIONS on this site<<<
Important
Admiral Refrigerator Parts Amana Refrigerator Parts Caloric Refrigerator Parts Electrolux Refrigerator Parts Frigidaire Refrigerator Parts GE Refrigerator Parts Hotpoint Refrigerator Parts Jenn-Air Refrigerator Parts Kenmore Refrigerator Parts (Sears) KitchenAid Refrigerator Parts Magic Chef Refrigerator Parts Maytag Refrigerator Parts Roper Refrigerator Parts Tappan Refrigerator Parts Whirlpool Refrigerator Parts White-Westinghouse Refrigerator Parts
Parts
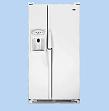
UNPLUG the Refrigerator!

...and of course, the contents should be removed.
You may find taking a few digital photos (of your specific refrigerator) as you disassemble the housing will help you reassemble it.
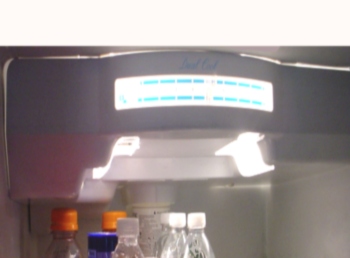
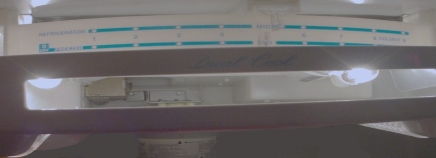
Remove light shield cover (#21) by grasping the top front of the control panel to drop the front down a little.
In the rear of the cover (#21) are several slots/holes that will help you slide (with your index fingers) the cover forward.
In the rear of the cover (#21) are several slots/holes that will help you slide (with your index fingers) the cover forward.


Note: The bottles were placed inside and the lights are on to illustrate and orient you to the position of the cover. You will remove the contents and unplug before starting as previously noted!


*You may have to loosen the hex screw(s) on the water filter holder (#24) on some models in order to remove the light shield cover (#21). DO NOT remove the filter holder. Check your model to see if this is necessary.
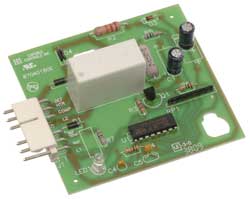
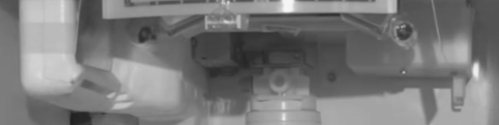
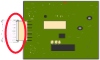
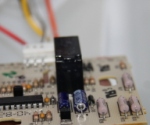
Carefully reach in, loosen, and pull the wiring harness connector off of the adaptive defrost control board (ADC), then remove the board (ADC).
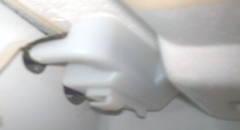
As you slide the cover, lightly push up on the cover near the two tabs (with your thumbs), while sliding the cover (#21) towards you. You have to pull the cover while releasing the tab (locks) by pushing up, then slide out. This may require a little up/down movement.
Note: Different models are sometimes used to illustrate. Your model may have more or less parts and/or they may be different in other ways.
3/4


Step-1
Step-2
Step-3


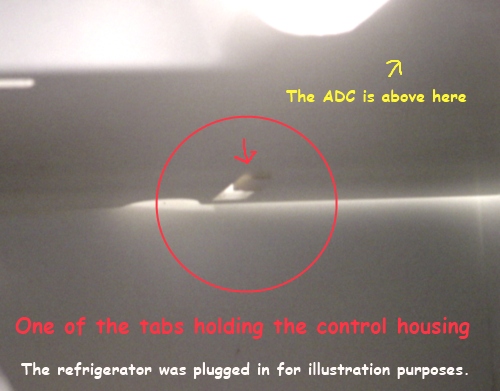
This is what the tab looks like on top of the cover.
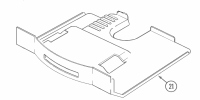
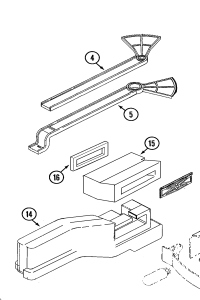
Do NOT remove the damper housing [tunnel] (and foam insulation, gasket, # 14, 15, 16,) that run along the left side of the top of the freezer wall. You might have difficulty in lining it back up.


Note: Do not loosen the water filter holder if it is not preventing you from dropping the heat shield (#19) and/or the control shield (#1) or light shield cover (#21).
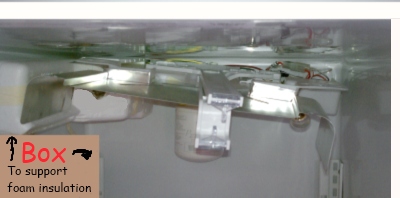
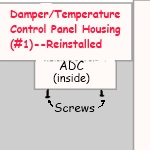
Drop down the heat shield assembly (#19) (just the front). On some models the damper/temperature control panel housing (#1) is attached, and both will drop as one unit. The ADC is located in the right rear. Your model may have the ADC attached to the housing with one or two small screws.
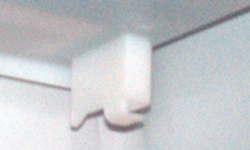
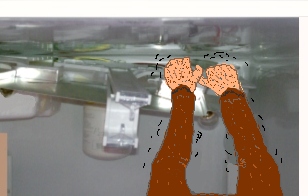
You can support the damper housing/insulation with a cardboard box or similar object. Don't bend and twist parts any more than absolutely necessary.
You can support the damper housing/insulation with a cardboard box or similar object. Don't bend and twist parts any more than absolutely necessary.

ADC
It is not necessary to drop the damper/temperature control housing (#1) down this far. Some have struggled to reattach some parts after doing this. Keep it simple!


Step-4
Reassemble the housing in reverse order, and plug in the refrigerator.
Step-5

Grip the connector with one hand and the board with the other hand. Do NOT pull on the wires!
Step-6

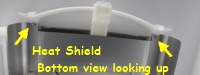


Three views of the heat shield #19
Looking upwards from the glass shelf inside the refrigerator

You can support the damper housing/insulation with a box or similar object. (see illustration below)
These are examples--your model may be different.

Tip: Read through all the steps before actually removing anything!
>>>
Water Filter Holder
: Loosen screws or not?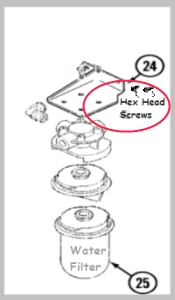

*See note on Step-4--Water Filter Holder


Detached Wiring Harness Connector

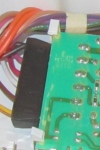
Connect the wiring harness to the new adaptive defrost control board, then insert it into the control panel housing (#1).
Step-7


Attach Wiring Harness Connector
Step-8

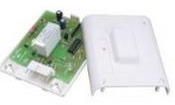
The kit should come with instructions.
Different ADC Board
ADC
for this Maytag
Secure the board to the housing using the screws that you removed, if applicable to your model.
If you own a headlamp, this is a good time to use it!


...and reference it while viewing this page!


The New One


Heat Shield Assembly
(#19) andDamper/Temperature Control Panel Housing
(#1)
Just let it hang down with support--don't try to remove it!


No Screws
YES!
NO!

I know what you're thinking. "I have seen this before, and it is okay." Well do you feel lucky?
Do you?
Do you?
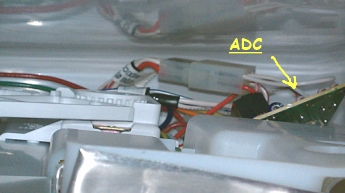
Your ADC may have one or two screws fastening it to the housing (#1) from underneath. Remove them, then remove the ADC.

Light Shield Cover


Replacing the ADC
Replace the screws by reversing the procedure used to remove them--if applicable.


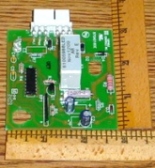
The ADC isn't that large! (inches)


Your connector may be white or another color.


(Continued)
<<Go Back
<<Go Back


Refrigerator Parts
Note: Larger computer screens will show larger materials!
This is a FREE information site!
Part of EdDx Educational Series
Part of EdDx Educational Series

www.EducationDx.com
3/4
Adaptive Defrost Control Repair

Step-1
Tip: Read through all the steps before actually removing anything!
UNPLUG the Refrigerator!
...and of course, the contents should be removed.
You may find taking a few digital photos (of your specific refrigerator) as you disassemble the housing will help you reassemble it.
>>>

...and reference it while viewing this page!
Step-2
Remove light shield cover (#21) by grasping the top front of the control panel to drop the front down a little.
In the rear of the cover (#21) are several slots/holes that will help you slide (with your index fingers) the cover forward.
In the rear of the cover (#21) are several slots/holes that will help you slide (with your index fingers) the cover forward.
As you slide the cover, lightly push up on the cover near the two tabs (with your thumbs), while sliding the cover (#21) towards you. You have to pull the cover while releasing the tab (locks) by pushing up, then slide out. This may require a little up/down movement.
*See note on Step-4--Water Filter Holder
Note: The bottles were placed inside and the lights are on to illustrate and orient you to the position of the cover. You will remove the contents and unplug before starting as previously noted!
This is what the tabs looks like on top of the cover.
Step-3
Remove the two light bulbs (#18) from the sockets (#17).
There are two keyhole slots that will allow the heat shield (#19) to move then drop after removing the two hex head screws. This should allow you to remove the dial face (#23) from the heat shield.
Just remove the dial face, NOT the arms (#4 & 5).
Some models have two additional Phillips head screws near (above) the light sockets in the heat shield (remove them), and one hex screw on the d/t control housing (#1) rear wall near the top.
There are two keyhole slots that will allow the heat shield (#19) to move then drop after removing the two hex head screws. This should allow you to remove the dial face (#23) from the heat shield.
Just remove the dial face, NOT the arms (#4 & 5).
Some models have two additional Phillips head screws near (above) the light sockets in the heat shield (remove them), and one hex screw on the d/t control housing (#1) rear wall near the top.
Three views of the heat shield #19


Looking upwards from the glass shelf inside the refrigerator
Do NOT remove the damper housing [tunnel] (and foam insulation, gasket, # 14, 15, 16,) that run along the left side of the top of the freezer wall. You might have difficulty in lining it back up.
You can support the damper housing/insulation with a box or similar object. (see illustration below)
Step-4
Water Filter Holder: Loosen screws or not?

*You may have to loosen the hex screw(s) on the water filter holder (#24) on some models in order to remove the light shield cover (#21). DO NOT remove the filter holder. Check your model to see if this is necessary.
Note: Do not loosen the water filter holder if it is not preventing you from dropping the heat shield (#19) and/or the control shield (#1) or light shield cover (#21).


Step-5
Drop down the heat shield assembly (#19) (just the front). On some models the damper/temperature control panel housing (#1) is attached, and both will drop as one unit. The ADC is located in the right rear. Your model may have the ADC attached to the housing with one or two small screws.
You can support the damper housing/insulation with a cardboard box or similar object. Don't bend and twist parts any more than absolutely necessary.
You can support the damper housing/insulation with a cardboard box or similar object. Don't bend and twist parts any more than absolutely necessary.

ADC
Heat Shield Assembly
(#19) andDamper/Temperature Control Panel Housing
(#1)
Just let it hang down with support--don't try to remove it!
It is not necessary to drop the damper/temperature control housing (#1) down this far. Some have struggled to reattach some parts after doing this. Keep it simple!
The ADC isn't that large! (inches)
Inside the refrigerator compartment with the heat shield and damper/temperature control panel housing pulled down for illustration. Some models allow this flexibility--some are not this forgiving!
I know what you're thinking. "I have seen this before, and it is okay." Well do you feel lucky?
Do you?
Do you?

ADC

If you own a headlamp, this is a good time to use it!
Step-6
Your ADC may have one or two screws fastening it to the housing (#1) from underneath. Remove them, then remove the ADC.
Carefully reach in, loosen, and pull the wiring harness connector off of the adaptive defrost control board (ADC), then remove the board (ADC).
Grip the connector with one hand and the board with the other hand. Do NOT pull on the wires!
Detached Wiring Harness Connector
ADC
for this Maytag
Your connector may be white or another color.

Step-7
The New One
The kit should come with instructions.
Connect the wiring harness to the new adaptive defrost control board, then insert it into the control panel housing (#1).
Secure the board to the housing using the screws that you removed, if applicable to your model.
Attach Wiring Harness Connector

Replace the screws by reversing the procedure used to remove them--if applicable.

Step-8
Reassemble the housing in reverse order, and plug in the refrigerator.
Next>>>
EducationDx
©2016, 2023
©2016, 2023


Disclosure:
Some links on this website are associate links and are used to help illustrate what an item looks like, and you can decide if you want to just look or purchase the item. "As an Amazon Associate, I earn from qualifying purchases." We receive a small commission (that helps support this website) if you actually purchase from this company, but the price to you remains the same.
You can hover over any link to see if it is an Amazon link, if this matters, or a link to a page on this website or to a reference page, e.g., Smithsonian Institution, bookmark on this website, etc.
EducationDx
©2016, 2023
©2016, 2023

Disclosure:
Some links on this website are associate links and are used to help illustrate what an item looks like, and you can decide if you want to just look or purchase the item. "As an Amazon Associate, I earn from qualifying purchases." We receive a small commission (that helps support this website) if you actually purchase from this company, but the price to you remains the same.
You can hover over any link to see if it is an Amazon link, if this matters, or a link to a page on this website or to a reference page, e.g., Smithsonian Institution, bookmark on this website, etc.
Some links on this website are associate links and are used to help illustrate what an item looks like, and you can decide if you want to just look or purchase the item. "As an Amazon Associate, I earn from qualifying purchases." We receive a small commission (that helps support this website) if you actually purchase from this company, but the price to you remains the same.
You can hover over any link to see if it is an Amazon link, if this matters, or a link to a page on this website or to a reference page, e.g., Smithsonian Institution, bookmark on this website, etc.