

This is a FREE information site!
Part of EdDx Educational Series
Part of EdDx Educational Series
>>PHOTOS and ILLUSTRATIONS on this site<<
Floor Cleaner Repair Parts
Hoover FLOORMATE

Floormate Floor Cleaner Repair
www.EducationDx.com


These connectors just screw on and off.
Yes, that is the old plastic hose part just to illustrate--I already installed the new one on the Floormate.
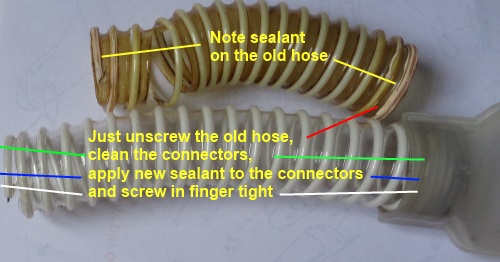


Note: When you are replacing the hose, apply a light coat of non-hardening, non-lubricating sealant that is compatible with plastic in the connectors (fittings). The important part here is the "non-hardening and compatible with plastic" part. Normally, you would apply the paste to the male or hose part, but in this case you can apply a light coating to the outside of the hose (just the part that will be inside the connector) and a light coating to the connector threads.
The non-lubricating part is simply so you won't tighten the hose and plastic connector too much. Of course, you want to be able to remove the hose and connectors if they need to be replaced in the future. Do NOT use any type of adhesive. Some types of pipe sealer contain solvents that may cause problems. Trying to find a product with all the correct ingredients may require some serious searching. I tried some pipe dope paste that is non-hardening and is compatible with some plastics. So far, so good!
The non-lubricating part is simply so you won't tighten the hose and plastic connector too much. Of course, you want to be able to remove the hose and connectors if they need to be replaced in the future. Do NOT use any type of adhesive. Some types of pipe sealer contain solvents that may cause problems. Trying to find a product with all the correct ingredients may require some serious searching. I tried some pipe dope paste that is non-hardening and is compatible with some plastics. So far, so good!
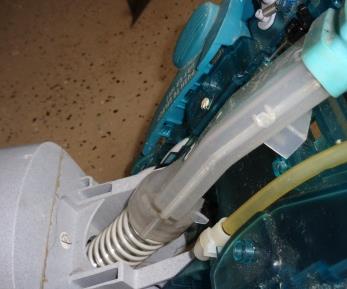
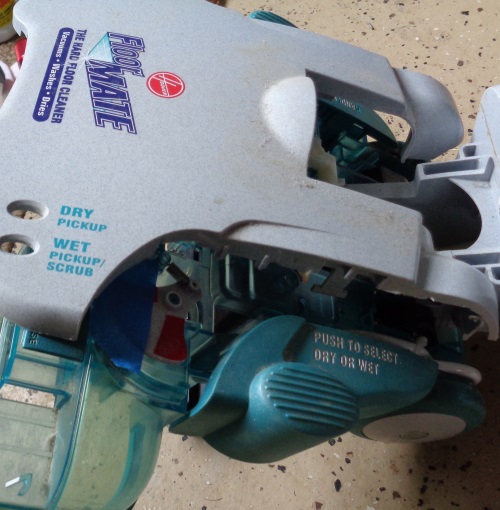
FLOORMATE in the horizontal position at this time
Unscrew the new connectors from the new hose. You will be reusing the old connectors originally installed on the FLOORMATE (unless you were able to find an actual new part, in that case use all of the new parts! P.S.: It has been discontinued!!!!)


After you apply the sealant, screw the WCA plastic tube back on the hose. You can do this immediately as the sealant doesn't need any set-up time. Wipe off any excess sealant--it can get messy!
Then push the hose back through the hole. Next, gently push the two rear plastic tabs back into the base as well as the front rectangular tab.
Then push the hose back through the hole. Next, gently push the two rear plastic tabs back into the base as well as the front rectangular tab.
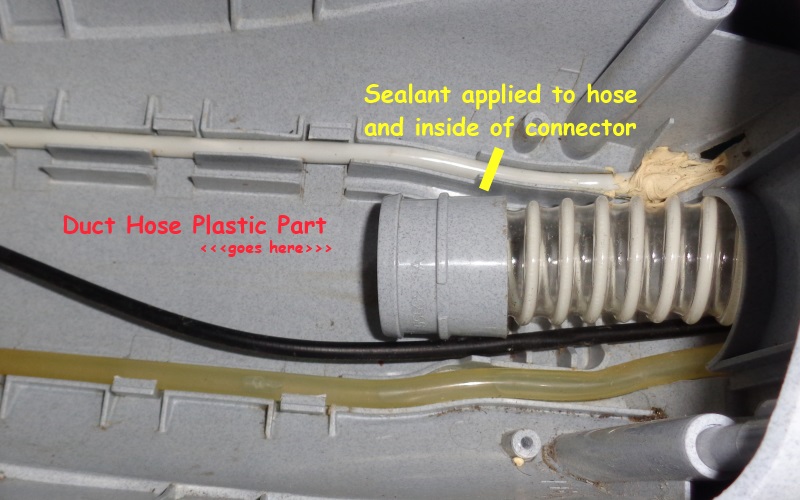

Sealant is applied on the DH end of the hose and in the connector of the WCA, then screwed on.
Note: You can right click on some items to view an enlarged version
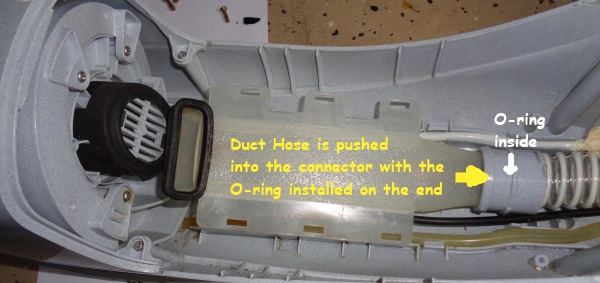
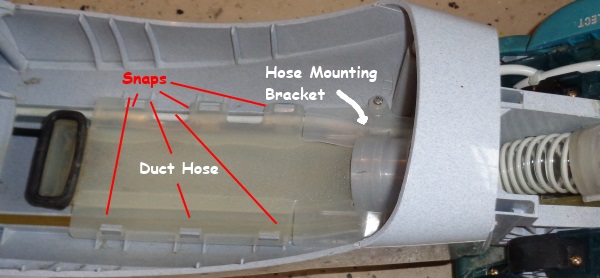
The Duct Hose (plastic tube) is then pushed into the connector with the O-ring installed on the end.
Do NOT apply sealant to the O-ring!
The Duct Hose is gently snapped back onto the plastic tabs and the clear Hose Mounting Bracket is reattached with the two Phillips screws.
Replace the hood in reverse order that you removed it, i.e., back first, then sides then front. Carefully snap the hood tabs into the base holes.
Install the Recovery tank back into the correct position. Make sure any other parts that you removed are reinstalled.
Install the Recovery tank back into the correct position. Make sure any other parts that you removed are reinstalled.

You are ready to go!

EducationDx
©2018
©2018
Back to Page 1
New connectors that you won't use--just the plastic hose part!
(View Sealant)
As previously mentioned, there are possible alternatives available. I found the one in this photo on Amazon but it is no longer available!
I have not tried any of the alternatives offered below. One of these is reasonable and two are expensive. You can return the item if it doesn't work (before cutting or altering!)
I have not tried any of the alternatives offered below. One of these is reasonable and two are expensive. You can return the item if it doesn't work (before cutting or altering!)
(View Pond Tubing)
(View Expensive Parts)

Reasonable
*Disclosure: The “Check Amazon Link” buttons on this page are associate links and are used to provide more details about an item, and you can decide if you want to just look or purchase the item. "As an Amazon Associate, I earn from qualifying purchases." We receive a small commission (that helps support this website) if you actually purchase from this company, but the price to you remains the same.


Floor Cleaner Repair Parts
Note: You can right click on some items to view an enlarged version
FLOORMATE Repair
>>PHOTOS and ILLUSTRATIONS on this site<<
This is a FREE information site!
www.EducationDx.com
Note: Larger computer screens will show larger materials!--and more detail!!
These connectors just screw on and off.
New connectors that you won't use--just the plastic hose part!
Yes, that is the old plastic hose part just to illustrate--I already installed the new one on the Floormate.
Note: You can right click on some items to view an enlarged version

Note: When you are replacing the hose, apply a light coat of non-hardening, non-lubricating sealant that is compatible with plastic in the connectors (fittings). The important part here is the "non-hardening and compatible with plastic" part. Normally, you would apply the paste to the male or hose part, but in this case you can apply a light coating to the outside of the hose (just the part that will be inside the connector) and a light coating to the connector threads.
The non-lubricating part is simply so you won't tighten the hose and plastic connector too much. Of course, you want to be able to remove the hose and connectors if they need to be replaced in the future. Do NOT use any type of adhesive. Some types of pipe sealer contain solvents that may cause problems. Trying to find a product with all the correct ingredients may require some serious searching. I tried some pipe dope paste that is non-hardening and is compatible with some plastics. So far, so good!
The non-lubricating part is simply so you won't tighten the hose and plastic connector too much. Of course, you want to be able to remove the hose and connectors if they need to be replaced in the future. Do NOT use any type of adhesive. Some types of pipe sealer contain solvents that may cause problems. Trying to find a product with all the correct ingredients may require some serious searching. I tried some pipe dope paste that is non-hardening and is compatible with some plastics. So far, so good!


Next, gently push the two rear plastic tabs back into the base as well as the front rectangular tab.
Then push the hose back through the hole.
Note: You can right click on some items to view an enlarged version
Sealant is applied on the DH end of the hose and in the connector of the WCA, then screwed on.
The Duct Hose (plastic tube) is then pushed into the connector with the O-ring installed on the end.
Do NOT apply sealant to the O-ring!
The Duct Hose is gently snapped back onto the plastic tabs and the clear Hose Mounting Bracket is reattached with the two Phillips screws.
Replace the hood in reverse order that you removed it, i.e., back first, then sides then front. Carefully snap the hood tabs into the base holes.
Install the Recovery tank back into the correct position. Make sure any other parts that you removed are reinstalled.
Install the Recovery tank back into the correct position. Make sure any other parts that you removed are reinstalled.
You are ready to go!

EducationDx
©2018
©2018
After you apply the sealant, screw the WCA plastic tube back on the hose. You can do this immediately as the sealant doesn't need any set-up time. Wipe off any excess sealant--it can get messy!
FLOORMATE in the horizontal position at this time
Back to Page 1

Unscrew the new connectors from the new hose. You will be reusing the old connectors originally installed on the FLOORMATE (unless you were able to find an actual new part, in that case use all of the new parts! P.S.: It has been discontinued!!!!)
(View Pond Tubing)
Reasonable
(View Expensive Parts)
As previously mentioned, there are possible alternatives available. I found the one in this photo on Amazon but it is no longer available!
I have not tried any of the alternatives offered below. One of these is reasonable and two are expensive. You can return the item if it doesn't work (before cutting or altering!)
I have not tried any of the alternatives offered below. One of these is reasonable and two are expensive. You can return the item if it doesn't work (before cutting or altering!)
(View Sealant)
*Disclosure: The “Check Amazon Link” buttons on this page are associate links and are used to provide more details about an item, and you can decide if you want to just look or purchase the item. "As an Amazon Associate, I earn from qualifying purchases." We receive a small commission (that helps support this website) if you actually purchase from this company, but the price to you remains the same.


This is a FREE information site!
Part of EdDx Educational Series
Part of EdDx Educational Series
>>PHOTOS and ILLUSTRATIONS on this site<<
Floor Cleaner Repair Parts
Hoover FLOORMATE
Floormate Floor Cleaner Repair
www.EducationDx.com


These connectors just screw on and off.
Yes, that is the old plastic hose part just to illustrate--I already installed the new one on the Floormate.

Note: When you are replacing the hose, apply a light coat of non-hardening, non-lubricating sealant that is compatible with plastic in the connectors (fittings). The important part here is the "non-hardening and compatible with plastic" part. Normally, you would apply the paste to the male or hose part, but in this case you can apply a light coating to the outside of the hose (just the part that will be inside the connector) and a light coating to the connector threads.
The non-lubricating part is simply so you won't tighten the hose and plastic connector too much. Of course, you want to be able to remove the hose and connectors if they need to be replaced in the future. Do NOT use any type of adhesive. Some types of pipe sealer contain solvents that may cause problems. Trying to find a product with all the correct ingredients may require some serious searching. I tried some pipe dope paste that is non-hardening and is compatible with some plastics. So far, so good!
The non-lubricating part is simply so you won't tighten the hose and plastic connector too much. Of course, you want to be able to remove the hose and connectors if they need to be replaced in the future. Do NOT use any type of adhesive. Some types of pipe sealer contain solvents that may cause problems. Trying to find a product with all the correct ingredients may require some serious searching. I tried some pipe dope paste that is non-hardening and is compatible with some plastics. So far, so good!
FLOORMATE in the horizontal position at this time
Unscrew the new connectors from the new hose. You will be reusing the old connectors originally installed on the FLOORMATE (unless you were able to find an actual new part, in that case use all of the new parts! P.S.: It has been discontinued!!!!)


After you apply the sealant, screw the WCA plastic tube back on the hose. You can do this immediately as the sealant doesn't need any set-up time. Wipe off any excess sealant--it can get messy!
Then push the hose back through the hole. Next, gently push the two rear plastic tabs back into the base as well as the front rectangular tab.
Then push the hose back through the hole. Next, gently push the two rear plastic tabs back into the base as well as the front rectangular tab.

Sealant is applied on the DH end of the hose and in the connector of the WCA, then screwed on.
Note: You can right click on some items to view an enlarged version
The Duct Hose (plastic tube) is then pushed into the connector with the O-ring installed on the end.
Do NOT apply sealant to the O-ring!
The Duct Hose is gently snapped back onto the plastic tabs and the clear Hose Mounting Bracket is reattached with the two Phillips screws.
Replace the hood in reverse order that you removed it, i.e., back first, then sides then front. Carefully snap the hood tabs into the base holes.
Install the Recovery tank back into the correct position. Make sure any other parts that you removed are reinstalled.
Install the Recovery tank back into the correct position. Make sure any other parts that you removed are reinstalled.

You are ready to go!

EducationDx
©2018
©2018
Back to Page 1
New connectors that you won't use--just the plastic hose part!
(View Sealant)
As previously mentioned, there are possible alternatives available. I found the one in this photo on Amazon but it is no longer available!
I have not tried any of the alternatives offered below. One of these is reasonable and two are expensive. You can return the item if it doesn't work (before cutting or altering!)
I have not tried any of the alternatives offered below. One of these is reasonable and two are expensive. You can return the item if it doesn't work (before cutting or altering!)
(View Pond Tubing)
(View Expensive Parts)

Reasonable
*Disclosure: The “Check Amazon Link” buttons on this page are associate links and are used to provide more details about an item, and you can decide if you want to just look or purchase the item. "As an Amazon Associate, I earn from qualifying purchases." We receive a small commission (that helps support this website) if you actually purchase from this company, but the price to you remains the same.