


Refrigerator Defrost Parts
If your refrigerator freezer compartment is cold, but the refrigerator compartment is warm--It could be a defrost problem.
www.EducationDx.com
Refrigerator Parts-
Defrost System
Defrost System
PHOTOS and ILLUSTRATIONS on this site
This is a FREE information site!
Part of EdDx Educational Series
Part of EdDx Educational Series
Sometimes making the correct diagnosis can be tricky even for someone with expertise and after testing. However, if you can follow directions (like unplug the refrigerator!), and have some basic mechanical/electrical skills, you could diagnose and effect a repair. Know your limitations and call a repair person if necessary! Some parts can store energy--even when the unit is UNPLUGGED!
When the refrigerator is not cooling but the freezer compartment is cold, just replacing refrigerator parts and hoping that you got the right one isn't the answer. You can systematically check and replace only the refrigerator replacement parts you need.
This is not a "sales" site. If you have to replace a part, you can decide whether to buy at a local store or online. ALWAYS compare refrigerator parts prices before ordering. You don't have to buy to compare prices and to find out what is included for that price. Don't lose money because you did not check!
When trying to find out what is causing your cooling problem, you may notice frost covering the back panel inside the freezer. Sometimes, unplugging the refrigerator (to defrost) will solve the problem temporarily.


When a defrost problem occurs, it is usually the fault of one or more of three basic parts: defrost timer/adaptive defrost control, freezer thermostat or the defrost heater element. The "good" news is that you can buy all three parts for around $100 (for all 3). Of course, more expensive parts, diagnostics and service fees are added when a repair tech does this, and if you are unsure of your technical abilities, this may be the route to go.
Note: Larger computer screens will show larger materials!
If you unplug to manually defrost the refrigerator, remove the food contents and be prepared to catch any melting ice water. You or the repair tech will need to defrost your system to diagnose, repair or replace parts anyhow (note: There are exceptions). This can be a very time consuming process, as well as costly.
TIP:
Find your ice chest or borrow one or two to store your food in while defrosting.
No ice chest? You can use a plastic garbage bag (double) filled with the ice cubes you will be taking out of your freezer! Keep the ice cubes in a separate SEALED bag inside the main bag! You can use Blue Ice (or other ice substitutes) if you have some instead of ice cubes.
Sometimes you won't know if the repair is successful until a few days or a week later. That is because sometimes just defrosting the system enables the cold air to get into the refrigerator compartment again. However, unless it was just a freak occurrence caused by high humidity or some other phenomenon, the reason that the defrost system malfunctioned still exists, and the symptoms will no doubt return.
So if you don't make the proper diagnosis and repairs, the problem will continue to plague you. You probably don't want to defrost your refrigerator manually every week, after all, isn't that why you bought a frost free one in the first place?
Let's examine the problem. Your model may differ from the illustrations, but the same principles apply. There may be some variations, e.g., your refrigerator may have a defrost timer or an adaptive defrost control.
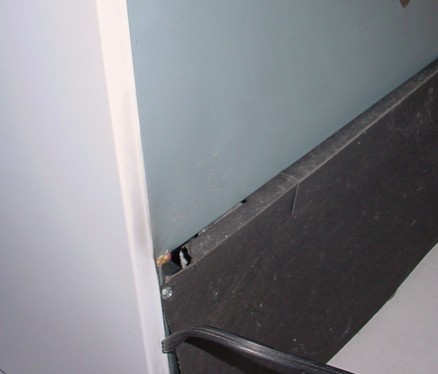
Remove the black cardboard panel cover on the bottom rear portion of the refrigerator. There are about 4 or 5 small hex screws holding this. You need to remove this to monitor and suction off water if the water level rises when you start the defrost.


TOOLS or accessories that you might use:
Suction Bulb Tool (or meat baster--don't use this for cooking after using here!)
Needle-Nose Pliers (to replace heater)
1/4" hex nut socket and driver (Do not use electric drills or power screwdrivers!)
Hair Dryer w/GFCI (if you are impatient)
Cloths, pans, and sponge (for water removal)
Suction Bulb Tool (or meat baster--don't use this for cooking after using here!)
Needle-Nose Pliers (to replace heater)
1/4" hex nut socket and driver (Do not use electric drills or power screwdrivers!)
Hair Dryer w/GFCI (if you are impatient)
Cloths, pans, and sponge (for water removal)

If the level rises (depends on how much ice build-up you have) you may need to suction off water in the built-in defrost evaporator pan (bottom, rear of refrigerator behind that black cardboard panel cover) as the ice melts (or you might have a watery mess to clean up).
It is only designed to catch a relatively small amount of frost that evaporates when the refrigerator is running normally. Keep an eye on this, as you may have a lot of water or just a small amount as the ice melts.
It is only designed to catch a relatively small amount of frost that evaporates when the refrigerator is running normally. Keep an eye on this, as you may have a lot of water or just a small amount as the ice melts.
As mentioned above, it is possible that this simple
If you feel lucky, you might plug the refrigerator back in and see if it works. It may work for a few days/weeks, or it may run longer. However, if you have come this far, why not test the three components to be sure? You may need to replace a part or two, and why not do it while you have the refrigerator cleaned out and defrosted?
defrosting of the freezer
might solve your problem, if it was just a freak occurrence--like something steaming was placed in the freezer or the worn door gaskets [if so--replace them] have allowed moisture/humidity to accumulate in the freezer compartment.If you feel lucky, you might plug the refrigerator back in and see if it works. It may work for a few days/weeks, or it may run longer. However, if you have come this far, why not test the three components to be sure? You may need to replace a part or two, and why not do it while you have the refrigerator cleaned out and defrosted?
Next
>>>Testing
>>>Testing
EducationDx
©2015
©2015
Sponsored Links


Heater, Thermostat, Timer/Adaptive Defrost Control
If your refrigerator freezer compartment is cold, but the refrigerator compartment is warm--It could be a defrost problem.
>>>PHOTOS and ILLUSTRATIONS on this site<<<
If your refrigerator freezer compartment is cold, but the refrigerator compartment is warm--It could be a defrost problem.
>>>PHOTOS and ILLUSTRATIONS on this site<<<
www.EducationDx.com
When the refrigerator is not cooling but the freezer compartment is cold, just replacing refrigerator parts and hoping that you got the right one isn't the answer. You can systematically check and replace only the refrigerator replacement parts you need.
If you have to replace a part, you can decide whether to buy at a local store or online. ALWAYS compare refrigerator parts prices before ordering. You don't have to buy to compare prices and to find out what is included for that price. Don't lose money because you did not check!
As you read this page, you will find some of the material repeated. This is because some readers may be diagnosing while others just want to replace parts. In any case, I recommend that you read through the entire page to familiarize yourself with the information and visuals included.
You may wish to skip over anything you already know. Go straight to "Finally--Installing the New Parts" if this is all you want to know. Finally, this is not a manual for repair techs, although you may pick up a few pointers.
For more information and/or to illustrate, you can right click on some photos/images to enlarge them for a better view. Move your mouse over a word or photo and it will change if it is a link (highlight, change color, a hand may appear).
When trying to find out what is causing your cooling problem, you may notice frost covering the back panel inside the freezer. Sometimes, unplugging the refrigerator (to defrost) will solve the problem temporarily.
This is why the repair tech sometimes leaves thinking s/he solved the problem, only to have it return after the frost/ice builds up again in a few days or a week. During the return visit, you may be told that it is a different problem and you need to pay another "visitation" or service fee.
You may get angry at this point and say that this tech is not a diagnostician, but instead a parts changer! Either is possible, but sometimes actually changing the part(s) is the only way to know.
You may get angry at this point and say that this tech is not a diagnostician, but instead a parts changer! Either is possible, but sometimes actually changing the part(s) is the only way to know.

"When a defrost problem occurs, it is usually the fault of one or more of three basic parts:
(1) defrost timer/adaptive defrost control,
(2) freezer thermostat or
(3) the defrost heater element. The "good" news is that you can buy all three parts..." (read this section)
(1) defrost timer/adaptive defrost control,
(2) freezer thermostat or
(3) the defrost heater element. The "good" news is that you can buy all three parts..." (read this section)
EducationDx
©2016, 2023
©2016, 2023
What's the abbreviation for mountain? MT.
If you unplug to manually defrost the refrigerator, remove the food contents and be prepared to catch any melting ice water. You or the repair tech will need to defrost your system to diagnose, repair or replace parts anyhow (note: There are exceptions). This can be a very time consuming process, as well as costly.

Sometimes you won't know if the repair is successful until a few days or a week later. That is because sometimes just defrosting the system enables the cold air to get into the refrigerator compartment again. However, unless it was just a freak occurrence caused by high humidity or some other phenomenon, the reason that the defrost system malfunctioned still exists, and the symptoms will no doubt return.
So if you don't make the proper diagnosis and repairs, the problem will continue to plague you. You probably don't want to defrost your refrigerator manually every week, after all, isn't that why you bought a frost free one in the first place?
Let's examine the problem. Your model may differ from the illustrations, but the same principles apply. There may be some variations, e.g., your refrigerator may have a defrost timer or an adaptive defrost control.
So if you don't make the proper diagnosis and repairs, the problem will continue to plague you. You probably don't want to defrost your refrigerator manually every week, after all, isn't that why you bought a frost free one in the first place?
Let's examine the problem. Your model may differ from the illustrations, but the same principles apply. There may be some variations, e.g., your refrigerator may have a defrost timer or an adaptive defrost control.
Be Prepared!
Remove the black cardboard panel cover on the bottom rear portion of the refrigerator. There are about 4 or 5 small hex screws holding this. You need to remove this to monitor and suction off water if the water level rises when you start the defrost.
Next
>>>Testing
>>>Testing
If the level rises (depends on how much ice build-up you have) you may need to suction off water in the built-in defrost evaporator pan (bottom, rear of refrigerator behind that black cardboard panel cover) as the ice melts (or you might have a watery mess to clean up).
It is only designed to catch a relatively small amount of frost that evaporates when the refrigerator is running normally. Keep an eye on this, as you may have a lot of water or just a small amount as the ice melts.
It is only designed to catch a relatively small amount of frost that evaporates when the refrigerator is running normally. Keep an eye on this, as you may have a lot of water or just a small amount as the ice melts.
Freezer Illustration
(right click to enlarge and print a copy)
(right click to enlarge and print a copy)
Sometimes making the correct diagnosis can be tricky even for someone with expertise and after testing. However, if you can follow directions (like unplug the refrigerator!), and have some basic mechanical/electrical skills, you could diagnose and effect a repair. Know your limitations and call a repair person if necessary! Some parts can store energy--even when the unit is UNPLUGGED!


Admiral Refrigerator Parts Amana Refrigerator Parts Caloric Refrigerator Parts Electrolux Refrigerator Parts Frigidaire Refrigerator Parts GE Refrigerator Parts Hotpoint Refrigerator Parts Jenn-Air Refrigerator Parts Kenmore Refrigerator Parts (Sears) KitchenAid Refrigerator Parts Magic Chef Refrigerator Parts Maytag Refrigerator Parts Roper Refrigerator Parts Tappan Refrigerator Parts Whirlpool Refrigerator Parts White-Westinghouse Refrigerator Parts
UNPLUG
It is assumed that you have already removed the stored food items, since the refrigerator isn’t cooling. Also, it is assumed that the problem is not a clogged drain line (see #14 in freezer illustration) (is there ice blocking the trough drain hole?) from the bottom of the freezer (evaporator) coils or a problem with the freezer fan (is it turning?)- (see #5 in freezer illustration) or freezer damper (is it opening and closing?) or the air-diverter (see #35 in freezer illustration). *
*The upcoming pages will illustrate how to view these areas!
TIP:
Find your ice chest or borrow one or two to store your food in while defrosting.
No ice chest? You can use a plastic garbage bag (double) filled with the ice cubes
you will be taking out of your freezer! Keep the ice cubes in a separate SEALED bag
inside the main bag! You can use Ice Block (or other ice substitutes) if you have some
instead of ice cubes.
TOOLS or accessories that you might use:
Suction Bulb Tool (or meat baster--don't use this for cooking after using here!)
Needle-Nose Pliers (to replace heater)
1/4" hex nut socket and driver (Do not use electric drills or power screwdrivers!)
Hair Dryer w/GFCI (if you are impatient)
Cloths, pans, and sponge (for water removal)
Suction Bulb Tool (or meat baster--don't use this for cooking after using here!)
Needle-Nose Pliers (to replace heater)
1/4" hex nut socket and driver (Do not use electric drills or power screwdrivers!)
Hair Dryer w/GFCI (if you are impatient)
Cloths, pans, and sponge (for water removal)
As mentioned above, it is possible that this simple
If you feel lucky, you might plug the refrigerator back in and see if it works. It may work for a few days/weeks, or it may run longer. However, if you have come this far, why not test the three components to be sure? You may need to replace a part or two, and why not do it while you have the refrigerator cleaned out and defrosted?
defrosting of the freezer
might solve your problem, if it was just a freak occurrence--like something steaming was placed in the freezer or the worn door gaskets [if so--replace them] have allowed moisture/humidity to accumulate in the freezer compartment.If you feel lucky, you might plug the refrigerator back in and see if it works. It may work for a few days/weeks, or it may run longer. However, if you have come this far, why not test the three components to be sure? You may need to replace a part or two, and why not do it while you have the refrigerator cleaned out and defrosted?
Parts
Remove food

When a defrost problem occurs, it is usually the fault of one or more of three basic parts: defrost timer/adaptive defrost control, freezer thermostat or the defrost heater element. The "good" news is that you can buy all three parts for around $150 (for all 3). Of course, more expensive parts, diagnostics and service fees are added when a repair tech does this, and if you are unsure of your technical abilities, this may be the route to go.
Refrigerator Defrost Parts
This is a FREE information site!
Part of EdDx Educational Series
Part of EdDx Educational Series


Refrigerator Defrost Parts
If your refrigerator freezer compartment is cold, but the refrigerator compartment is warm--It could be a defrost problem.
www.EducationDx.com
Refrigerator Parts-
Defrost System
Defrost System

PHOTOS and ILLUSTRATIONS on this site
This is a FREE information site!
Part of EdDx Educational Series
Part of EdDx Educational Series
Sometimes making the correct diagnosis can be tricky even for someone with expertise and after testing. However, if you can follow directions (like unplug the refrigerator!), and have some basic mechanical/electrical skills, you could diagnose and effect a repair. Know your limitations and call a repair person if necessary! Some parts can store energy--even when the unit is UNPLUGGED!
When the refrigerator is not cooling but the freezer compartment is cold, just replacing refrigerator parts and hoping that you got the right one isn't the answer. You can systematically check and replace only the refrigerator replacement parts you need.
If you have to replace a part, you can decide whether to buy at a local store or online. ALWAYS compare refrigerator parts prices before ordering. You don't have to buy to compare prices and to find out what is included for that price. Don't lose money because you did not check!
When trying to find out what is causing your cooling problem, you may notice frost covering the back panel inside the freezer. Sometimes, unplugging the refrigerator (to defrost) will solve the problem temporarily.
When a defrost problem occurs, it is usually the fault of one or more of three basic parts: defrost timer/adaptive defrost control, freezer thermostat or the defrost heater element. The "good" news is that you can buy all three parts for around $150 (for all 3). Of course, more expensive parts, diagnostics and service fees are added when a repair tech does this, and if you are unsure of your technical abilities, this may be the route to go.
Note: Larger computer screens will show larger materials!
If you unplug to manually defrost the refrigerator, remove the food contents and be prepared to catch any melting ice water. You or the repair tech will need to defrost your system to diagnose, repair or replace parts anyhow (note: There are exceptions). This can be a very time consuming process, as well as costly.
TIP:
Find your ice chest or borrow one or two to store your food in while defrosting.
No ice chest? You can use a plastic garbage bag (double) filled with the ice cubes you will be taking out of your freezer! Keep the ice cubes in a separate SEALED bag inside the main bag! You can use Ice Block (or other ice substitutes) if you have some instead of ice cubes.
Sometimes you won't know if the repair is successful until a few days or a week later. That is because sometimes just defrosting the system enables the cold air to get into the refrigerator compartment again. However, unless it was just a freak occurrence caused by high humidity or some other phenomenon, the reason that the defrost system malfunctioned still exists, and the symptoms will no doubt return.
So if you don't make the proper diagnosis and repairs, the problem will continue to plague you. You probably don't want to defrost your refrigerator manually every week, after all, isn't that why you bought a frost free one in the first place?
Let's examine the problem. Your model may differ from the illustrations, but the same principles apply. There may be some variations, e.g., your refrigerator may have a defrost timer or an adaptive defrost control.
So if you don't make the proper diagnosis and repairs, the problem will continue to plague you. You probably don't want to defrost your refrigerator manually every week, after all, isn't that why you bought a frost free one in the first place?
Let's examine the problem. Your model may differ from the illustrations, but the same principles apply. There may be some variations, e.g., your refrigerator may have a defrost timer or an adaptive defrost control.
Remove the black cardboard panel cover on the bottom rear portion of the refrigerator. There are about 4 or 5 small hex screws holding this. You need to remove this to monitor and suction off water if the water level rises when you start the defrost.

TOOLS or accessories that you might use:
Suction Bulb Tool (or meat baster--don't use this for cooking after using here!)
Needle-Nose Pliers (to replace heater)
1/4" hex nut socket and driver (Do not use electric drills or power screwdrivers!)
Hair Dryer w/GFCI (if you are impatient)
Cloths, pans, and sponge (for water removal)
Suction Bulb Tool (or meat baster--don't use this for cooking after using here!)
Needle-Nose Pliers (to replace heater)
1/4" hex nut socket and driver (Do not use electric drills or power screwdrivers!)
Hair Dryer w/GFCI (if you are impatient)
Cloths, pans, and sponge (for water removal)
If the level rises (depends on how much ice build-up you have) you may need to suction off water in the built-in defrost evaporator pan (bottom, rear of refrigerator behind that black cardboard panel cover) as the ice melts (or you might have a watery mess to clean up).
It is only designed to catch a relatively small amount of frost that evaporates when the refrigerator is running normally. Keep an eye on this, as you may have a lot of water or just a small amount as the ice melts.
It is only designed to catch a relatively small amount of frost that evaporates when the refrigerator is running normally. Keep an eye on this, as you may have a lot of water or just a small amount as the ice melts.
As mentioned above, it is possible that this simple
defrosting of the freezer
might solve your problem, if it was just a freak occurrence--like something steaming was placed in the freezer or the worn door gaskets [if so--replace them] have allowed moisture/humidity to accumulate in the freezer compartment.
Next
>>>Testing
>>>Testing
EducationDx
©2016, 2023
©2016, 2023
Menu

(Ice Block)

(door gaskets)
*Disclosure: The “Check Amazon Link” buttons on this page are associate links and are used to provide more details about an item, and you can decide if you want to just look or purchase the item. "As an Amazon Associate, I earn from qualifying purchases." We receive a small commission (that helps support this website) if you actually purchase from this company, but the price to you remains the same.

(Ice Block)
(door gaskets)
If you feel lucky, you might plug the refrigerator back in and see if it works. It may work for a few days/weeks, or it may run longer. However, if you have come this far, why not test the three components to be sure? You may need to replace a part or two, and why not do it while you have the refrigerator cleaned out and defrosted?
*Disclosure: The “Check Amazon Link” buttons on this page are associate links and are used to provide more details about an item, and you can decide if you want to just look or purchase the item. "As an Amazon Associate, I earn from qualifying purchases." We receive a small commission (that helps support this website) if you actually purchase from this company, but the price to you remains the same.
Sponsored Links

Sponsored Links