


www.EducationDx.com
Floormate Floor Cleaner Repair
This is a FREE information site!
Part of EdDx Educational Series
Part of EdDx Educational Series
>>PHOTOS and ILLUSTRATIONS on this site<<

Floor Cleaner Repair
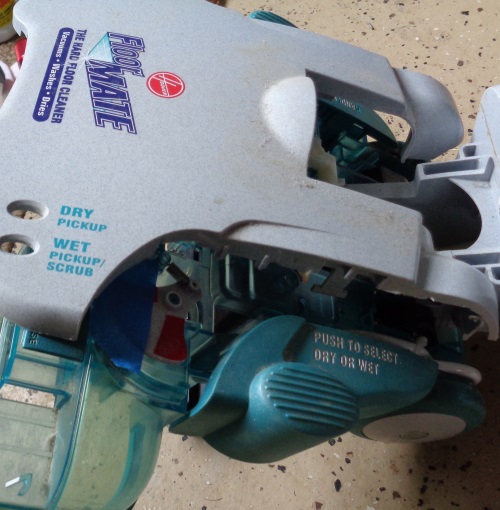
Hoover FLOORMATE

Note: You can right click on some items to view an enlarged version

tabs=stems
There are NO screws here!
Just slightly push in with the blade of the putty knife and lift gently.
The tabs (stems) will bend slightly, do not snap them!
Just slightly push in with the blade of the putty knife and lift gently.
The tabs (stems) will bend slightly, do not snap them!

You need to undo 6 plastic tabs (stems) to get the hood off. This will separate the gray plastic hood from the plastic base. Be careful not to pry against the bottom too forcefully.

The "HOOD"

This section will detail how to remove the hood.
Start in the front with these two--just start prying and work your way around to the sides. Don't try to get them all the way loose at this point. Don't twist the putty knife; just try to push in the plastic tabs enough to release, then lift.


Note: This putty knife just happens to be on the hood. It does not mean anything in this photo. You can use a sharp clean putty knife ( I had another one!) or a flat blade screwdriver with a thin blade to help pry.
Work your way around to the next plastic tabs on the left and right side, slowly prying--just loosen.


Go back and look at the view of the hood from the inside (above) to help see how the plastic tabs are shaped.
The rear tabs should start to come up as you are gently prying on the sides.
Put the FLOORMATE in the horizontal position if you haven't already done so. Gently pick up on the front section and the hood should lift off. Take note of this, since you will just reverse the procedure to reinstall, i.e., back first, then sides then front.

You can view the entire Water Channel Assembly and the connection to the Duct Hose.
Note the Duct Hose has been unsnapped. The connector with the O-ring inside is still intact in this photo.
Note the Duct Hose has been unsnapped. The connector with the O-ring inside is still intact in this photo.


The rubber O-ring in the connector is examined and replaced if necessary when the parts are reinstalled. This one was in good shape. This O-ring helps provide a water seal between the connector and the Duct Hose. The O-ring doesn't appear to be proprietary, i.e., take the old one to Home Depot, Lowes or your local hardware store and ask them to match it.
O

If you are feeling lucky, you can try to unscrew the hose without removing the hard plastic section of the WCA. I just simply removed the whole WCA!
The plastic hose is "sealed" in the connectors with a compound on both the WCA end and the DH end. By removing the hose from the the hard plastic section of the WCA, it made it easier to get the old compound out and to add new sealant on the new part.


WCA removed
Now would be a good time to finish cleaning the inside of the FLOORMATE while you have some parts removed. Don't get over-ambitious by removing other parts that you will wish you had not!
Why???? Re-read: "You are probably wondering..." above.
EducationDx
©2018
©2018


The Water Channel Assembly (WCA) is now removed by gently prying up on the two back plastic tabs and the front rectangular tab.
The WCA can be pulled through the hole out towards the front of the FLOORMATE. (make sure the DH connector is removed first).
The WCA can be pulled through the hole out towards the front of the FLOORMATE. (make sure the DH connector is removed first).


>>PHOTOS and ILLUSTRATIONS on this site<<
FLOORMATE Repair
This is a FREE information site!
www.EducationDx.com
Note: Larger computer screens will show larger materials!--and more detail!!
Floor Cleaner Repair
Note: You can right click on some items to view an enlarged version
The "HOOD"
This section will detail how to remove the hood.
You need to undo 6 plastic tabs (stems) to get the hood off. This will separate the gray plastic hood from the plastic base. Be careful not to pry against the bottom too forcefully.


There are NO screws here!
Just slightly push in with the blade of the putty knife and lift gently.
The tabs (stems) will bend slightly, do not snap them!
Just slightly push in with the blade of the putty knife and lift gently.
The tabs (stems) will bend slightly, do not snap them!

Start in the front with these two--just start prying and work your way around to the sides. Don't try to get them all the way loose at this point. Don't twist the putty knife; just try to push in the plastic tabs enough to release, then lift.
Work your way around to the next plastic tabs on the left and right side, slowly prying--just loosen.
Go back and look at the view of the hood from the inside (above) to help see how the plastic tabs are shaped.
The rear tabs should start to come up as you are gently prying on the sides.
Put the FLOORMATE in the horizontal position if you haven't already done so. Gently pick up on the front section and the hood should lift off. Take note of this, since you will just reverse the procedure to reinstall, i.e., back first, then sides then front.
Note: This putty knife just happens to be on the hood. It does not mean anything in this photo. You can use a sharp clean putty knife ( I had another one!) or a flat blade screwdriver with a thin blade to help pry.

The plastic hose is "sealed" in the connectors with a compound on both the WCA end and the DH end. By removing the hose from the the hard plastic section of the WCA, it made it easier to get the old compound out and to add new sealant on the new part.
If you are feeling lucky, you can try to unscrew the hose without removing the hard plastic section of the WCA. I just simply removed the whole WCA!
The Water Channel Assembly (WCA) is now removed by gently prying up on the two back plastic tabs and the front rectangular tab.
The WCA can be pulled through the hole out towards the front of the FLOORMATE. (make sure the DH connector is removed first).
The WCA can be pulled through the hole out towards the front of the FLOORMATE. (make sure the DH connector is removed first).
The rubber O-ring in the connector is examined and replaced if necessary when the parts are reinstalled. This one was in good shape. This O-ring helps provide a water seal between the connector and the Duct Hose. The O-ring doesn't appear to be proprietary, i.e., take the old one to Home Depot, Lowes or your local hardware store and ask them to match it.
O
Note: You can right click on some items to view an enlarged version
You can view the entire Water Channel Assembly and the connection to the Duct Hose.
Note the Duct Hose has been unsnapped. The connector with the O-ring inside is still intact in this photo.
Note the Duct Hose has been unsnapped. The connector with the O-ring inside is still intact in this photo.
WCA removed
Now would be a good time to finish cleaning the inside of the FLOORMATE while you have some parts removed. Don't get over-ambitious by removing other parts that you will wish you had not!
Why???? Re-read: "You are probably wondering..." above.


EducationDx
©2018
©2018


Note: When you are replacing the hose, use a non-hardening, non-lubricating sealant that is compatible with plastic. More on this coming up.
Note: When you are replacing the hose, use a non-hardening, non-lubricating sealant that is compatible with plastic. More on this coming up.

Dont skip this step!
or you might be kicking yourself.....
or you might be kicking yourself.....
(View Sealant)
*Disclosure: The “Check Amazon Link” buttons on this page are associate links and are used to provide more details about an item, and you can decide if you want to just look or purchase the item. "As an Amazon Associate, I earn from qualifying purchases." We receive a small commission (that helps support this website) if you actually purchase from this company, but the price to you remains the same.
Dont skip this step!
or you might be kicking yourself.....
or you might be kicking yourself.....
*Disclosure: The “Check Amazon Link” buttons on this page are associate links and are used to provide more details about an item, and you can decide if you want to just look or purchase the item. "As an Amazon Associate, I earn from qualifying purchases." We receive a small commission (that helps support this website) if you actually purchase from this company, but the price to you remains the same.
(View Sealant)